jmvScaffold: R functions to develop jamovi modules
2023
Chapter 1 Introduction
1.1 Preface
Draft version, mistakes may be around
Here you can find a how-to to build a jamovi package using the R package jmvScaffold, which provides several functions and R6 classes to ease the development of jamovi modules. Much of the jamovi module development information can be found in the jamovi developer’s hub.
Reference and detailed functions description of the package can be found in jmvScaffold reference page.
We should note that developing a jamovi module does not require any of this material. This material, furthermore, will not make your coding easier than just using jamovi functions as described in jamovi developer’s hub. However, when your module starts to get a bit complicated, offering several analyses and sub-modules, or when you want your module to do more sophisticated actions, or a more refined style is needed, this material may come handy.
This documentation assumes that the reader is familiar with the basic of jamovi module development, but one may get away without that, and be able to develop a jamovi module only reading these pages.
To program a jamovi module, you want to have a basic knowledge of R6 classes. You do not need much, as it is very easy to work with them. R6 classes bring object-oriented programming to R. R6 objects are basically functions that know themselves.
A final word to end the preface: Here we assume that we want to build a jamovi module, store it to github, and then publish it in the jamovi library. If you do not have the second or the third aim (you may want to build a module only for yourself), you can skip the parts related with them.
1.2 Getting Started
First, you need to get ready for developing a module, so you want to consult jamovi developer’s hub getting started section. In a nutshell, you need:
To install jamovi
To install
jmvtoolsR package, provided by the jamovi core developing group.
- To install
jmvScaffoldR package (check out if you need some dependency)
We will see that your module will not need to install jmvScaffold to work, you just need it to program. Thus, when you publish your module, jamovi will not need to install jmvScaffold package. The necessary files to take advantage of the functions and classes provided by jmvScaffold will be part of your module, independently of jmvScaffold package. Thus, no change or update of jmvScaffold will affect your code in the future, nor any link to the package will bind your code to it.
1.3 Create a module
A module in jamovi is a R package that works also in jamovi. As such, it needs to have all the characteristics of a R package, plus the additional information and coding required to interface the R package to jamovi. Thus, to obtain a working module we need to make steps both for the R package and for the jamovi interface.
We now create a new module, named COOLj. At the end of this material, the COOLj module will look like this. For simplicity, we aim at producing a module that does a linear regression and some other simple statistics.
First, we create its folder (so be sure you are in a parent folder) and the folders structure with jmvtool
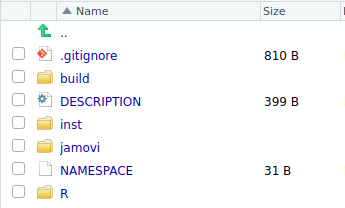
This should produce, in the COOLj folder, this structure.
If you use RStudio, it is a good idea to create a project in the COOLj folder, because working with
RStudio projects make our lives much easier.
We now need to fill the DESCRIPTION file as for any R package. Here an example
Package: COOLj
Type: Package
Title: Simple example of jmvScaffold
Version: 0.0.1
Author: mcfanda
Maintainer: Mcfanda <yourself@somewhere.net>
Description: This is an example of
    jmvScaffold
License: GPL
Encoding: UTF-8
LazyData: true
Imports: jmvcore (>= 0.8.5), R6
This describes your package in R. Now we need to define a description for jamovi, filling the file
./jamovi/0000.yaml
title: Simple example of jmvScaffold
name: COOLj
version: 0.0.1
jms: '1.0'
authors:
  - Mcfanda
maintainer: mcfanda <yourself@somewhere.net>
date: '2023-1-1'
type: R
description: >-
      This is an example of jmvScaffold
analyses: []
usesNative: true
minApp: 1.0.8
We will get back to this file later on. For now, we happy.
Finally, we copy the jmvScaffold classes in our module ./R folder with
1.4 Defining the analysis
A module can do several things, but at least it should execute one analysis. By analysis I mean a set of stats
that would produce some results, such as t-test, a correlation, a machine learning classification algorithm, a Bayesian supercool test equivalent to the t-test .
In this example we want to develop a module that deal with linear models. We start simply, and aim at producing a linear regression.
We make it more complex later on. This model will be useless, because jamovi already comes with a nice command for regression, Regression->Linear Regression, or one can install GAMLj module for regressions and many other linear models. Here we set this aim for demonstrative purposes.
1.5 jamovi analysis
We want to call this analysis myRegression. Thus, we create a file named myRegression in the ./jamovi/ folder.
The option name decides the name of the R function that will be produced, and the option title decides how
the function will be labelled in the jamovi menu (it can be changed later on if needed).
Running the command produces several files. In the ./jamovi/ folder we have
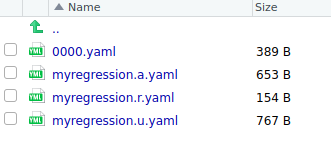
In them, the jamovi input and output features are defined.
In *.a.yaml file the input options are defined, see API here jamovi hub: Analysis.
In *.u.yaml file the input layout is of the user interface is defined, see API here jamovi hub: GUI
In *.r.yaml file the output results tables are defined, see API here jamovi hub: Results
We should fill them all.